🎁 Buy 2 kits, get the 3rd FREE · Free shipping on every order

Building an Italian Tuscan Miniature Villa: Design, Materials & Community Inspiration
Learn how to build and style an Italian Tuscan miniature villa with authentic details, from terracotta roofing to cypress trees and warm ochre walls. Discover kit options, sourcing materials, and design principles that capture the essence of Tuscany at 1:12 scale.

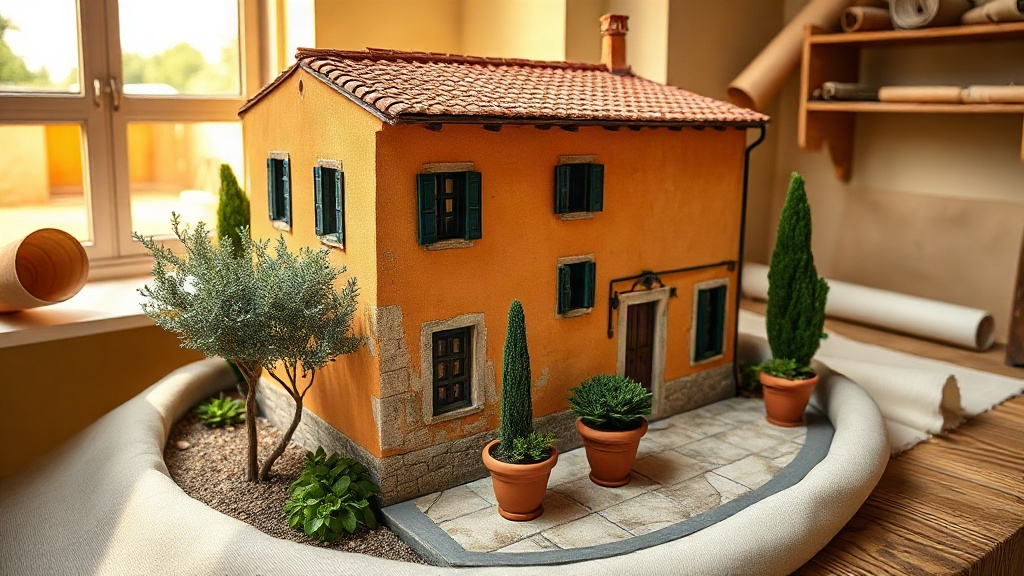
There’s something about Tuscan architecture that stops people in their tracks. The warm ochre walls, the terra cotta roof tiles catching afternoon light, the way cypress trees frame a distant hillside. When you translate that romance into miniature form, something magical happens. A Italian Tuscan miniature villa at 1:12 scale becomes not just a model, but a meditation on light, color, and the rhythms of rural Italy. You’re not just gluing walls together; you’re preserving an aesthetic that has survived centuries.
Building one of these kits is an entirely different experience from constructing a contemporary dollhouse. The materials demand respect. The color palette is narrow but precise. The details that make it feel authentic are the ones nobody rushes. This is the kind of project that rewards patience and pulls you into a state of flow where time dissolves.
Why Tuscan Villas Capture Miniature Builders’ Hearts
The Tuscan villa aesthetic arrives with built-in appeal that no trend has to manufacture: warm terracotta, aged stone, and weathered wooden shutters have been working together for five hundred years, and at 1:12 scale those proportions feel inherently right. The heavy door frames don’t look clumsy. The thick walls don’t seem overdone. Everything reads as substantial without feeling cramped.
Many builders choose Tuscan villa kits because the style forgives imperfection in the most liberating way. A rough plaster finish isn’t a mistake; it’s authenticity. Uneven paint is character. Weathering that would ruin a contemporary build becomes evidence of time and sunlight on a villa’s exterior. This is genuinely freeing, especially for builders working through their first or second major project.
The color story is another draw. Ochres, warm greens, terracotta, aged whites, deep charcoal for shutters and doors. These tones sit beautifully together and are far easier to source than cool-gray Scandinavian palettes. Craft suppliers stock them because the market recognizes them as timeless. You won’t be hunting down specialty paints; these colors live on the standard shelf.
🪄 Hannah’s tip
Before you commit to paint colors, photograph real Tuscan villas at different times of day. The light changes everything. Morning sun hits ochre walls differently than late afternoon, and shadows from shutters create depth you might not predict from a paint swatch. Collect references. Your miniature will feel more alive if you’ve studied how light actually moves across these buildings.
Before you commit to paint colors, photograph real Tuscan villas at different times of day. The light changes everything. Morning sun hits ochre walls differently than late afternoon, and shadows from shutters create depth you might not predict from a paint swatch. Collect references. Your miniature will feel more alive if you’ve studied how light actually moves across these buildings.
Choosing the Right Kit for Your Skill Level
Choosing the right Tuscan villa kit matters more than picking the prettiest box art: match the kit’s difficulty to your actual pace and patience, or the finishing quality that defines this style will suffer before you reach the fun parts. Here’s a practical breakdown of what each tier demands.

Bestseller cottage kit
Tranquil Life DIY Miniature House Kit
Warm Mediterranean palette included, a gentle first build for Tuscan-style lovers
$67.90
View this kit →
Entry-level kits typically arrive with pre-cut walls, a foundation already assembled, and straightforward instructions. Your job is finishing: painting, adding interior details, maybe installing shutters. Entry builds usually take 20 to 30 hours and introduce you to the techniques without overwhelming you.
Intermediate builds include more structural assembly. You’re gluing walls to a frame, installing a roof system, handling more detailed exterior work. Expect 40 to 60 hours for an intermediate kit. These builds reward patience and introduce real problem-solving when a corner doesn’t quite align perfectly. Most experienced community members recommend this tier as the sweet spot for people who’ve already finished one kit.
Advanced kits arrive in pieces. Stone walls need careful fitting and mortar work. Roof tiles are individually placed. Shutters are hand-crafted. These projects can stretch across months, and they’re designed for builders who already understand how materials behave.
| Tier | Typical Hours | What Arrives Assembled | Best For |
|---|---|---|---|
| Entry | 20-30 hrs | Foundation, pre-cut walls | First or second build |
| Intermediate | 40-60 hrs | Cut pieces, basic hardware | One finished kit under your belt |
| Advanced | 80 hrs + | Raw pieces only | Seasoned builders, months-long projects |
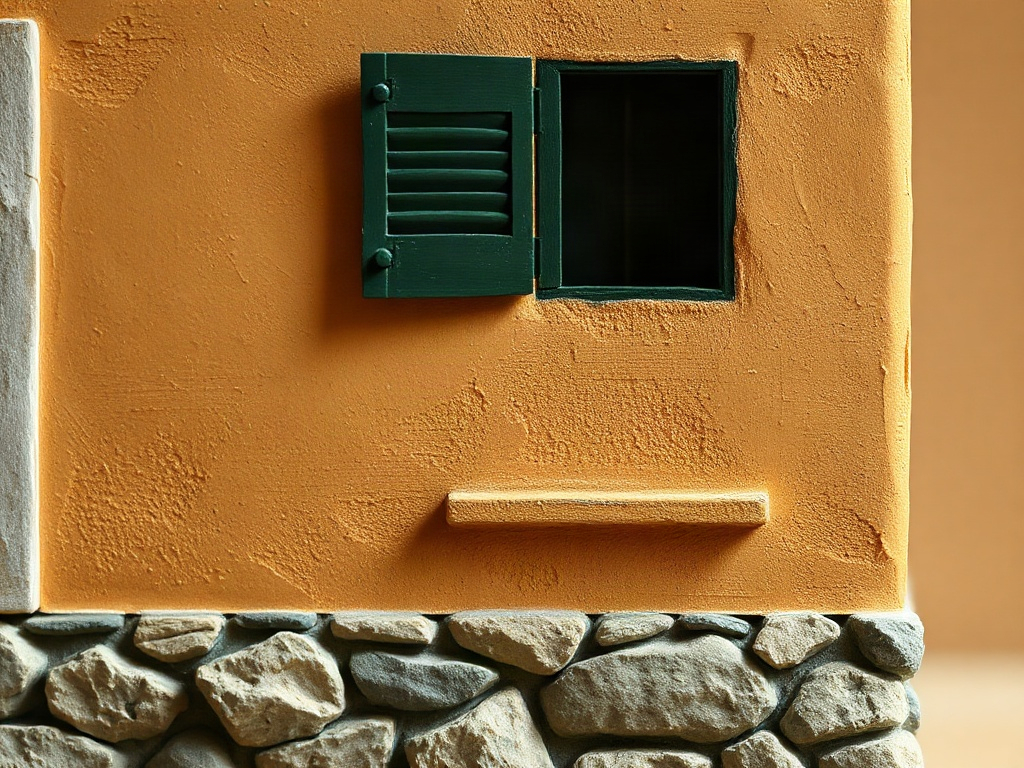
Difficulty ratings matter because a Tuscan miniature villa is not forgiving when you rush it. The style depends on texture and finish quality. A sloppy paint job reads immediately on a Mediterranean building where color is everything. Budget your time honestly, and choose a kit that matches your current pace and patience level.
✅ Key takeaway
If you’re unsure which tier fits you, choose one level below your instinct. The satisfaction of a beautifully finished entry build will teach you more than a rushed advanced kit sitting half-done on a shelf. The Tuscan style rewards completion, not ambition alone.
If you’re unsure which tier fits you, choose one level below your instinct. The satisfaction of a beautifully finished entry build will teach you more than a rushed advanced kit sitting half-done on a shelf. The Tuscan style rewards completion, not ambition alone.
Mastering Tuscan Color and Texture
The exterior palette is where a Tuscan villa earns its soul: ochre is the foundation, but real Tuscan buildings shift between golden yellows, burnt sienna, and dusty warm tones depending on the light, so layering two or three ochre shades always reads more convincingly than a single flat coat.
Mixing custom paint or layering different ochre tones adds depth that single-color finishes simply don’t achieve. Terra cotta roof tiles are non-negotiable. Don’t substitute. Real terracotta has variation; each tile reads slightly differently under light. If your kit includes smooth plastic tiles, upgrade or paint each one individually to create shade variation, that small effort changes the entire roofline.
Best for colour practice
Tranquil Life DIY Miniature House Kit
Warm ochre walls and timber details make this the ideal kit for practising Tuscan layering techniques
$67.90
View this kit →
Plaster texture matters. Real villas have lived long enough to show every rainstorm, every season change. Your walls shouldn’t be perfectly smooth. Texture paste, sponge-dabbing, and light dry-brushing create that weathered quality. Many builders use joint compound mixed into acrylic paint, applied with sea sponges, it’s cheap, controllable, and the results feel authentic immediately.
Shutters and doors anchor the color story. Deep green shutters or dark charcoal are traditional, though some Tuscan properties featured darker ochre or even deep burgundy. Wooden doors typically ran to rich brown or black. These dark elements frame windows and entryways, giving weight to openings that might otherwise feel flat at such a small scale.
Sourcing Authentic Details and Materials
Many Tuscan villa kits include solid base components but leave deliberate room for customisation, and the details you source yourself, scaled cypress trees, real dried herbs sealed with varnish, aged brass hardware, are what push a finished build from “nice model” to “place you want to step into.”
Miniature stone suppliers stock aged terracotta, weathered wood, and aged plaster surfaces. These are worth the investment because they read as real at arm’s length. Cypress trees are iconic and worth finding at 1:12 scale. They’re not common miniature subjects, but specialty suppliers carry them, or you can craft them from dark green dowels and carefully shaped foliage. Olive trees, lavender, and climbing vines complete the Mediterranean landscape. Real dried plant material, sealed with matte varnish, creates a softness that plastic alternatives never quite achieve.
Lighting transforms a Tuscan villa from a daytime view into something that feels lived-in. Warm LED string lights at 3000K or lower, tucked into window frames or along a courtyard, create the amber glow of Italian evening. Lantern sconces beside doors, or lights behind shuttered windows, suggest interior life. This is where the miniature stops being a sculpture and becomes a scene.
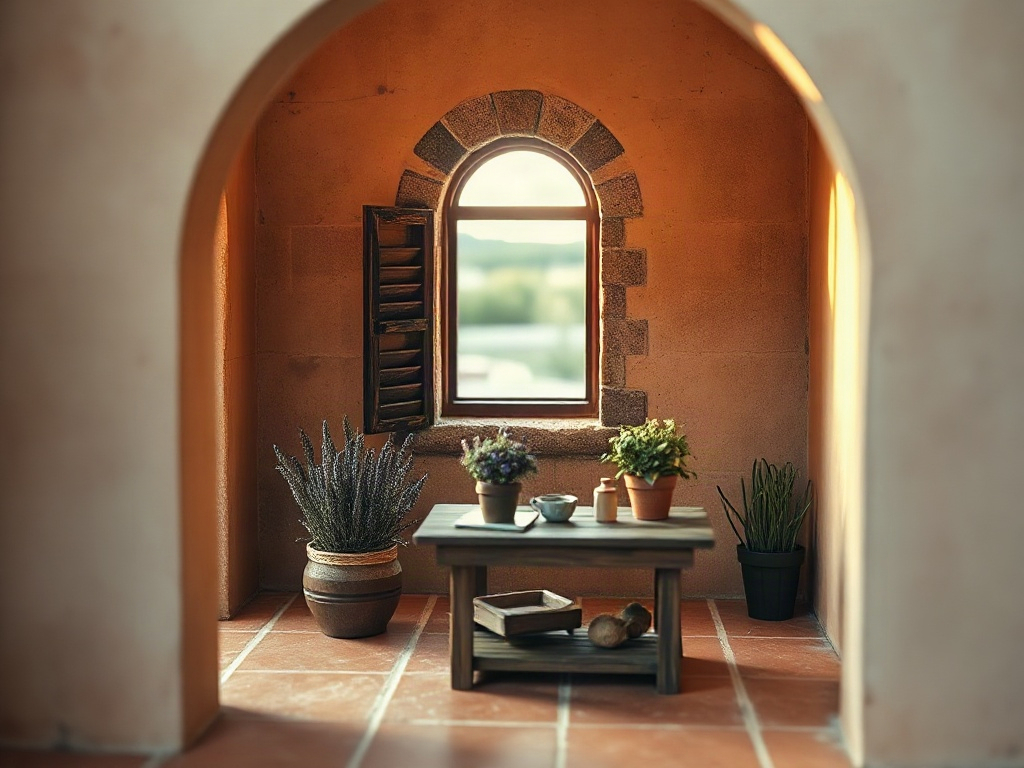
Interior furnishings follow the same logic as the exterior. Terracotta pots, wooden tables, aged paintings, warm textiles. Many builders source antique or vintage items at scale, searching estate sales and online communities. A single real brass candelabra or hand-thrown ceramic pitcher tells more than ten generic miniature pieces.
📜 Did you know?
The distinctive Tuscan villa style developed during the Renaissance, when wealthy Florentine families built country estates as both functional farms and symbols of status. The thick stone walls, deep overhangs, and central towers weren’t just beautiful; they provided defense and protected against heat. When you’re recreating these details at miniature scale, you’re honoring five centuries of practical design.
The distinctive Tuscan villa style developed during the Renaissance, when wealthy Florentine families built country estates as both functional farms and symbols of status. The thick stone walls, deep overhangs, and central towers weren’t just beautiful; they provided defense and protected against heat. When you’re recreating these details at miniature scale, you’re honoring five centuries of practical design.

Easy starter under $50
Sun Room DIY Miniature House Kit
Light-filled interiors and warm wood tones make this a natural companion to Tuscan colour techniques
$49.99
Start with this kit →
Building Techniques That Honor Tuscan Authenticity
Tuscan villas were built with stone, plaster, and time, so the single most important technique you can bring to a miniature build is the willingness to slow down: rushed finishes show immediately on a style where texture and weathering are the entire story.
Stone walls should be mortared; visible gaps are part of the aesthetic, not a flaw. Real mortar or textured joint compound creates shadow lines that separate stones and add dimension. Paint alone never flattens a stone wall the way smooth plastic substrate does, the shadows do the heavy lifting.
Weathering is essential. After you’ve finished the main build, step back and ask: where would water stain this building? Where would weather erode the plaster? Which walls catch the most sun? Dry-brushing darker ochres along upper edges, lighter tones at foundation level, and subtle rust tones where metal meets plaster creates a timeline. Your villa should look like it’s been standing for generations, not fresh from the kit box.
Windows benefit from careful treatment. Real Tuscan shutters actually close; building working shutters is more labor-intensive, but it adds an interactive dimension that elevates the entire piece. Glass or clear plastic panes should be absolutely clean, dusty or fogged windows kill the illusion faster than almost any other detail.
Roofing deserves its own focus. Terra cotta tiles laid in overlapping rows with visible grout lines read as authentic. If your kit provides individual tiles, take time with placement and color variation. If it includes pre-assembled roof panels, consider weathering them after installation. A roof that shows sun-fading and subtle color shifts feels real; one that’s uniformly colored reads as flat.
⚠️ Attention
Resist the urge to seal your villa with gloss varnish. Glossy surfaces destroy the aged Mediterranean look immediately. Always finish with a matte or satin spray. Test on a scrap piece first; some “matte” varnishes dry with a faint sheen that reads as gloss at small scale.
Resist the urge to seal your villa with gloss varnish. Glossy surfaces destroy the aged Mediterranean look immediately. Always finish with a matte or satin spray. Test on a scrap piece first; some “matte” varnishes dry with a faint sheen that reads as gloss at small scale.
Designing Your Tuscan Villa’s Landscape and Setting
The building itself is only half the story: a Tuscan villa exists inside a landscape of rolling hills, olive groves, and stone pathways, and recreating even a simplified version of that context at miniature scale is what transforms a pretty model into a complete world you want to linger over.

Rare in the niche
Miniature Greenhouse Kits
22 LED-lit greenhouse builds, pair one with your villa for a full walled-garden scene
See our greenhouse range →
Base work is crucial. If your kit comes on a simple platform, upgrade it. Create topography with wood, foam, or papier-mâché. Paint the base in warm earth tones that recede visually so the villa stays the focal point. Add gravel paths, grass effects, and strategic plantings that guide the eye toward the structure while framing the view from every angle.
Many builders create a courtyard or garden area immediately in front of the villa. A small fountain, potted plants, a bench, perhaps a table under an arbor. These details suggest daily life and invite the viewer to imagine inhabiting the space. Weathered stone pavers, clay pots, and climbing ivy make the courtyard feel established rather than freshly staged.
Consider background. A painted backdrop or a photograph mounted behind the base extends the perceived landscape. Tuscan hills at sunrise or sunset, cypress groves, distant villages, vineyard rows. This context prevents the villa from feeling isolated and deepens the sense of place in a way no amount of on-base detailing can fully replicate on its own.
Connecting with the Miniature Building Community
One of the most rewarding aspects of building a Tuscan miniature villa is sharing the process with other crafters: online communities dedicated to miniatures document builds obsessively, and the accumulated knowledge in those archives will solve almost any problem you encounter before you even have to ask.
Progress photos, problem-solving discussions, and encouragement from people who understand why you spent three hours weathering roof tiles creates a sense of shared purpose. These communities also function as living resource libraries. Someone has always solved the problem you’re facing. Need to know how to create aged plaster convincingly? Search the archives. Trying to find 1:12 cypress trees? The community knows where.
Many builders host builds in real-time, photographing each stage and sharing progress. This transparency teaches while it connects. You see how experienced builders handle challenges, make decisions, and recover from mistakes. It demystifies the process and reminds you that a stunning finished villa represents hours of small adjustments, not magic.
Premium collector piece
Monet’s Garden DIY Miniature House Kit
A lush garden build beloved by the community, frequently recommended alongside Tuscan landscape projects
$155.00
Discover this kit →
Frequently Asked Questions about Italian Tuscan Miniature Villas
Everything you might be wondering (click a question to expand).
How long does it take to build a Tuscan villa kit?
Time varies by kit complexity. Entry-level builds typically require 20 to 30 hours of focused work. Intermediate kits stretch to 40 to 60 hours. Advanced builds can span several months, especially if you’re sourcing custom details or creating detailed landscapes. Many builders break projects into phases, working on the structure first, then finishing, then detailing, then landscaping.
Do I need special tools to assemble a Tuscan villa?
Most kits require basic hobby tools: a craft knife, cutting mat, hot glue gun, small paintbrushes, and fine sandpaper. Advanced builds might benefit from a small hobby saw or rotary tool, but these are optional. The critical tools are patience and attention to detail, not expensive equipment.
Can I modify a kit to make it more authentic?
Absolutely. Most experienced builders treat kits as starting points. Upgrading materials, customizing colors, adding details, and changing proportions are all standard practice. This is where your personal vision takes over and the build becomes yours rather than the manufacturer’s design.
Where should I display a finished Tuscan villa?
Display depends on your space and how the build sits. Glass cases protect from dust while keeping the piece visible. Open shelf display works if you don’t mind occasional dusting. Window light enhances the Mediterranean aesthetic; warm artificial lighting works well for evening viewing. Many builders create custom shelving or room-box displays specifically designed around their miniature.
What’s the best way to preserve a finished build?
Keep your villa away from direct sunlight, which fades colors and degrades materials over time. Moderate temperature and humidity prevent warping and cracking. Use soft brushes or air dusters rather than cloth for cleaning. If you’ve used real plant materials, check periodically for decay. An acrylic matte varnish can seal finished pieces and protect them from dust and handling.
Which miniature house kit is closest to Tuscan style for beginners?
The Tranquil Life DIY Miniature House Kit is the most popular starting point in our community for builders drawn to warm Mediterranean palettes. It ships with pre-cut walls, a clear instruction booklet, and enough surface area to practise ochre layering and light weathering without feeling overwhelming. At $67.90 and roughly 20 to 30 build hours, it sits comfortably in the entry tier.
Living with Your Tuscan Miniature Villa
Once your finished villa is on its shelf or inside its display case, it becomes part of your daily environment in a way few handmade objects manage: you’ll notice it differently in morning light than in evening, and months later you’ll still spot small happy details you don’t remember placing.
Morning sun hits the walls differently than evening. Seasonal lighting changes how you perceive the colors. Over months and years, you’ll find yourself noticing new details you didn’t consciously place, small happy accidents that deepened the whole. Many builders describe their miniatures as deeply meditative to construct. The repetitive work of painting tiles, fitting stones, and weathering surfaces quiets the mind in a way that’s hard to explain until you’ve experienced it. When you’re done, you own something that represents not just hours of labor but genuine presence. That’s rare in a world of mass production and shortcuts. Your Tuscan villa will be exactly what you made it to be.
